Showing posts with label tutorial. Show all posts

Monday, 2 June 2025

Angela's PaperArts: Pop Out Gatefold card with video tutorial

I recently made a Pop Out Gatefold card for my Mum for Mother's Day and thought I'd make a video showing how to create this style of card and share it with my customers.

Here's the inside of the card that's created in the video. It features the Stampin' Up! Kintsugi Inspiration specialty designer series paper, Nested Essentials die set, Beautiful Motifs die set and the Unbounded Love stamp set.

Angelas's PaperArts: Stampin' Up! Kintsugi Inspirations Pop Out Gatefold card

Here's the overview view of the card so you can see its layers and shape.

Angelas's PaperArts: Stampin' Up! Kintsugi Inspirations Pop Out Gatefold card

If you'd like to learn how to make this style of special fold card, here's my video tutorial which also contains the template for cutting and scoring the paper needed to complete the card. 


The current Stampin' Up! products used on this project can be purchased from my online store if you live in Australia. My video also shows an initial sample card where I had used products from Snazzi Scrappin. 

Thanks for visiting.

Thursday, 29 May 2025

Angela's PaperArts: Vellum tips & techniques

Do you like the look of vellum but aren't sure what you can do with it?

This short video has some techniques for using vellum along with tips for adhering it onto your project.


I hope you find this video useful. 

The current Stampin' Up! products used in this video can be purchased from my online store if you live in Australia. 

Thanks for visiting.


Saturday, 8 June 2024

Angela's PaperArts: Stampin' Up! Hip Hip Hooray rosette card

I've made another card this week using the  versatile Stampin' Up! Round We Go stamp & die bundle. I made this Z fold card with the bundle and the Take To the Sky designer series paper.

Angela's PaperArts: Stampin Up Round We Go birthday card

Here's a side view of the card.
Angela's PaperArts: Stampin Up Round We Go birthday card

To assemble the rosette diecuts from the Round We Go set, simply:

  1. Diecut 2 rosette strips
  2. Add adhesive onto the rosette diecut tabs
  3. Concertina the strips along the scorelines & adhere together to form a circle.
  4. Gather the top of the circle together and press down to form the rosette. Adhere a cardstock circle onto the centre of the front & back of the rosette to keep it in place.
Angela's PaperArts: Stampin Up Round We Go birthday card

This bundle, along with other stamp & die bundles and machines, will be discounted from this Wednesday, 5 June, with an 10% off the price.

Angela's PaperArts: Bundle & save

The current Stampin' Up! products used on the project can be purchased from my online store if you live in Australia.

Thanks for visiting.

Thursday, 14 December 2023

Angela's PaperArts: Christmas Classics twisted easel card & tutorial

Why not add a little twist to your Christmas cards.

Angela's PaperArts: Stampin Up Christmas classics bundle twisted easel special fold card and tutorial

This twisted easel card features the Stampin' Up! Christmas Classics bundle which is sadly retiring and only available while stock lasts or until 3 January, 2024.

Angela's PaperArts: Stampin Up Christmas classics bundle twisted easel special fold card and tutorial


To create the twisted easel:
  • Score the front of any size of card base from the top right down to the bottom left of the card front and mountain fold. 
  • Add an embellishment inside the card which acts as a prop to keep the twisted card front in place.
  • Optional: To add a layer of patterned paper, cut the paper 0.5cm smaller than the height & width of the card front and then cut it on the diagonal from top left to bottom right to get the two separate pieces needed for the front of the card.
  • Decorate the front and inside of the card to suit your project.
    TIP: Make sure to adhere the card front embellishments onto one of the diagonal panels only so it can stand up without bending your embellishments.
Angela's PaperArts: Stampin Up Christmas classics bundle twisted easel special fold card and tutorial

Why not get this bundle before it's gone with free shipping this Thursday, 14 December 2023 only (orders of $65 or more).

The current Stampin' Up! products used on this project can be purchased from my online store if you live in Australia. All retiring products are only available while stock lasts or until 3 January 2024 at the latest.

Thanks for visiting.

Thursday, 13 April 2023

Angela's PaperArts: Paradise Palms Centre Step card

Unlike last week's card, this card is the traditional way of creating a Centre Step card.  It also farewells some favourite retiring Stampin' Up! products being the Paradise Palms stamp set and co-ordinating Palms dies - both of which are currently discounted as part of the Last Chance sale.

Angela's PaperArts: Stampin Up Paradise Palms centre step birthday card

You can find my tutorial for making the traditional Centre Step here.

Here's a side view of the card where you can see that the card base and feature panels are all created from the one piece of cardstock.  This is a much more economical card to make compared to last week's Faux Centre Step card.

Angela's PaperArts: Stampin Up Paradise Palms centre step birthday card

The products used on these projects can be purchased from my online store if you live in Australia.

Please note that these products are only available until 1 May, 2023 unless sold out as part of the Last Chance sale.


Thanks for visiting.

Thursday, 16 February 2023

Angela's PaperArts: Stampin' Up! Dainty Flowers chocolate slider gift box video tutorial & birthday card

I used the Stampin' Up! free Sale-a-Bration Dainty Flowers Designer Series Paper to create this chocolate slider gift box and co-ordinating birthday card. You can find my video tutorial for this project at the end of this post.

Angela's PaperArts: Stampin' Up! Dainty Flowers & Framed Florets chocolate slider gift box video tutorial & birthday card

The paper is so pretty, it doesn't need much embellishment.  The slider gift box was also decorated using the Framed Florets stamp set & co-ordinating dies bundle.

These slider gift boxes can be made in any size and for any occasion. You can see how to make this chocolate slider gift box on my youtube channel here.


The products used on these projects can be purchased from my online store if you live in Australia. 

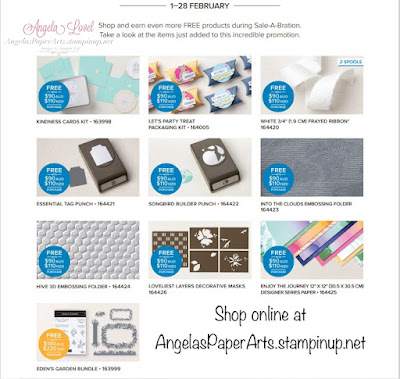
Just a reminder that Sale-a-Bration ends on 28 February 2023.  Any eligible product order of $90 or more can select from various Sale-a-Bration items for free to be added to the order.  There's no limit as to how many free Sale-a-Bration items you can earn as it's based on the total of your order. Here's the newest Sale-a-Bration items to be added as further options for selection.  You can see all the Sale-a-Bration items here:

Angela's PaperArts: Stampin Up 2023 SAB Sale-a-Bration  second release items

There's also three great value joining specials which may be of interest to you too. You can find all the information here, or feel free to contact me if you have any questions.


Thanks for visiting.

Thursday, 1 September 2022

Angela's PaperArts: Father's Day Vintage Tools Faux Centre Step card

I've been seeing a few Faux Centre Step cards on the internet lately and thought I'd give it a try.  

For a Centre Step card, I've always used the traditional method to create this style of card where you need to do partial cutting/make slits within the card base, so thought the faux version may be easier to do.  If you'd like to see instructions to create the traditional Centre Step Card, you can find my tutorial here.

Here's the Faux Centre Step card that I made for my Dad for Father's Day this Sunday.

Angela's PaperArts: Stampin Up Faux Centre Step Card featuring Textured Chic DSP and Vintage Tools

It features the Textured Chic Specialty Designer Series Paper, Distressed Gold 12x12" paper, Stylish Shapes dies for the banners & sentiment strips along with the Vintage Tools stamp set.

Here's a side view of the card.

Angela's PaperArts: Stampin Up Faux Centre Step Card featuring Textured Chic DSP and Vintage Tools

Here's the back of the card where I kept with the Vintage Tools theme and embossed the Evening Evergreen cardstock with the Timber 3D embossing folder for added texture.

Angela's PaperArts: Stampin Up Faux Centre Step Card featuring Textured Chic DSP and Vintage Tools

The positive for using the faux method over the traditional method is that you don't need to have a special paper trimmer or be skilled with a craft knife when creating this card.  The negative to this method is that it uses a lot more cardstock and designer series paper, so it isn't as economical to make.

The products used on this project can be purchased from my online store if you live in Australia.

It's all happening in September at Stampin' Up!

  1. September weekly dealsEach Thursday during September, Stampin' Up! will be discounting some products for one week.  You can check my online store here each Thursday to see each week's specials.
  2. Perfect Partners: Six stamp sets have had co-ordinating die sets released to match.  These die sets and special bundle prices are available during September, 2022 only or while stock lasts.  You can see the six stamp sets and dies here

Thanks for visiting.


Thursday, 19 May 2022

Angela's PaperArts: Stampin' Up! Forever Fern Joseph's Coat card

Today's card features the versatile Stampin' Up! Forever Fern stamp set and co-ordinating Forever Flourishing dies. This set can be used for many occasions.

Angela's PaperArts: Stampin Up Forever Fern Joseph's Coat card

To create the background of the card, I used the Joseph's Coat technique to get this effect. It requires:

  • Randomly inking a white piece of card stock in your favourite colours. I used an assortment of Stampin' Up! green ink pads for my background.
  • Stamp the Forever Fern images in Versamark ink, cover them with clear embossing powder and then heat set using your Heat Tool.
  • Cover the whole card stock with Memento Tuxedo Black ink by swiping the ink pad across the card stock.
  • Now the magic begins - using a piece of kitchen towel, wipe over the card stock.  The black ink will be removed from the clear heat embossed images and they will shine through the black background.
You then decorate the card to suit the occasion. 

If you're like me and like lots of different colours, you can receive the five new Stampin' Up! 2022-24 In-Color products for free when joining Stampin' Up! between 3-31 May, 2022.

Angela's PaperArts: Stampin' Up! 2022-24 In Colors

By joining Stampin' Up! during this time you'll receive $235 of products of your choice for only $169 + free catalogues to share with your friends & other supplies + free shipping + the additional $116.50 worth of 2022-24 In Color products for FREE.

If this is of interest to you and you live in Australia, please let me know and I'll help you through the joining process - or alternatively see the joining details here from 3 May.

Thanks for visiting.


Thursday, 31 August 2017

Born to be loved card

Spring is in the air and a couple of friends are due to have their babies soon.  I made this card in readiness for the arrival of one of the babies.

Stampin' Up! Born to be loved card by Angela Lovel, Angela's PaperArts
Angela's PaperArts - Born to be loved card

This card is a U fold card also known as a Bridge card and folds flat for posting in a C6 sized envelope.  This style of card has a real impact but is simple to make and can be used for any occasion - birthdays, weddings, Christmas etc.

Instructions
To create the U fold card:
  1. Cut a card base 27 x 15 cm and the bridge strip at the bottom of the card 21 x 3.5cm
  2. Score the card base long side at 6cm, 9cm, 18cm and 21cm and fold along the scorelines to create the recessed 'U' shape (6cm & 21cm scorelines = mountain fold, 9cm & 18cm scorelines = valley fold).
  3. Decorate the card to suit the occasion.
  4. Optional: If you want to add an additional layer of embellishments between the front and the back of the centre U part of the card, add an extra support bar across the U space.  This support piece is 12cm x 1.5cm, scored long side at 1.5cm and 10.5cm.  Adhere the two 1.5cm scored end pieces (mountain folded) to the inside of the U for extra support and to hold more embellishments.  I've added some diecut flowers & hearts/stars on window sheet onto this layer.
  5. Adhere the 21 x 3.5cm bridge strip across the front of the card, from edge to edge to connect the two sides.
  6. I've added my message to the new parents on the back of the U part of the card.
  7. To fold flat for posting, press down both sides flat in the same direction (e.g. push the two sides to the right).

Stampin' Up! Born to be loved card side view by Angela Lovel, Angela's PaperArts
Angela's PaperArts - Born to be loved card side view

For my card I've featured the Stampin' Up! Born to be Loved and Moon Baby stamp sets and the Bundle of Love Specialty Designer Series Paper.  I've used the Stampin' Up! Gold Embossing Powder to keep with the Gold and Very Vanilla colour scheme.  All supplies used can be found at the end of this post.

Stampin' Up! Born to be loved card closeup by Angela Lovel, Angela's PaperArts
Angela's PaperArts - Born to be loved card close up

Workshops and papercrafting classes are available - please contact me for details.  If you enjoy papercrafting and the Stampin' Up! products you may want to consider joining my team.  Click on the Join My Team link at the top of this page for more information or feel free to contact me to discuss the joining benefits if you live in Australia.

Thanks for visiting

Product List